

Introduction
Amazon Simple Storage Service (S3) is a popular cloud storage service that allows users to store and retrieve data from anywhere on the internet. While S3 provides a secure environment for storing data, it is important to protect the data from unauthorized access. One way to secure S3 access is by using CloudFront and signed URLs.
Using CloudFront to Secure S3 Access
CloudFront is a content delivery network (CDN) that can be used to securely deliver content to users around the world. CloudFront uses a network of servers around the world to cache and deliver your content, which makes it faster for users to access your data. By using CloudFront to serve S3 content, you can make the whole process faster, and it is in most cases also cheaper than accessing S3 directly. So only benefits, right?
For a detailed description on setting up Cloudfront check out this article, we going to do it fast here.
By configuring CloudFront to serve your S3 content, you can also restrict access to the S3 objects. You can configure CloudFront to use signed URLs, which are time-limited URLs that provide access to a specific S3 object. Signed URLs can be used to grant temporary access to a specific S3 object to a specific user or group of users.
Using Signed URLs to Secure S3 Access
Signed URLs are generated by your application and include a signature that verifies the authenticity of the URL. The signature is generated using a secret key that is known only to your application. When a user attempts to access a signed URL, CloudFront verifies the signature and grants access to the S3 object only if the signature is valid.
Signed URLs can be used to restrict access to specific S3 objects or to provide temporary access to a group of users. For example, you could use signed URLs to grant temporary access to a specific file to a group of users for a limited time.
Benefits of Using CloudFront and Signed URLs to Secure S3 Access
By using CloudFront and signed URLs to secure S3 access, you can add a layer of security to your S3 objects. CloudFront provides a global network of servers that can deliver content quickly and securely, while signed URLs ensure that only authorized users have access to your S3 objects.
In addition to providing enhanced security, using CloudFront and signed URLs can also improve the performance of your applications. By using CloudFront to serve your S3 content, you can reduce the load on your S3 buckets and improve the speed at which your content is delivered to users.
Implementing a URL signer in .net
Since your frontend runs on the client machine, it is not that secure. So there is no option to sign URLs directly in JavaScript frontend. Therefore, we need a Backend service.
I will show it to you using C# .net, but you can also do it in python or node or whatever you like.
How to get the Key Pair to use in AWS?
in CloudFront in the sidebar, go to public keys.

To generate the key in the wished format, do not run:
openssl genpkey -algorithm RSA -out private_key.pem -pkeyopt rsa_keygen_bits:2048
openssl rsa -pubout -in private_key.pem -out public_key.pem
The problem with that is that CloudFront is still using the deprecated PKCS#1 Format, which OpenSSL won't generate. I hope they will update it one day.
You may, will get an Amazon.Runtime.AmazonClientException: Invalid RSA Private Key error.
To generate a deprecated PKCS#1 public and private key, you can use this service.
Or you can write a python script that does it for you:
from Crypto.PublicKey import RSA

# Generate key pair
key = RSA.generate(2048)

# Save private key
with open("private_key_pkcs1.pem", "wb") as private_file:
    private_file.write(key.exportKey('PEM'))

# Save public key
with open("public_key.pem", "wb") as public_file:
    public_file.write(key.publickey().exportKey())
Save your private key into a .pem file.
Make sure to store your file safely! This could be for example in Azure Vault.
Do not store .pem files in your project's root! Do not commit it to GitHub! Do not share it! It is a private key, so keep it private!
What are possible consequences when committing a private key to git?
This is the answer from chatGPT:
Committing a .pem file (or any other private key or secret) to a public repository on GitHub (or any version control system) can lead to a number of serious security risks. Here are some of the potential consequences:
- Unauthorized Access: PEM files are typically used as private keys in public-private key authentication mechanisms. Anyone with access to this key can potentially authenticate to systems, databases, or applications that recognize this key.
- Financial Consequences: If the .pem file is a key for a cloud service (like AWS), unauthorized users can potentially spin up services, which could lead to financial charges.
- Data Breach: Unauthorized users can access sensitive data if the key is used for data decryption or for access to databases.
- Loss of Integrity: Malicious actors could alter your data or applications in unauthorized ways.
- Loss of Availability: Services or data could be deleted or otherwise made unavailable.
- Reputation Damage: A security breach, especially if it leads to data compromise or financial loss, can severely damage the reputation of individuals or companies involved.
- Legal Consequences: Data breaches, especially if they involve personally identifiable information or other sensitive data, can have legal ramifications.
- Removal Isn't Enough: Simply removing the file from your repository in a subsequent commit isn't sufficient, because the file remains available in the git history. You'd need to thoroughly purge the file from the repository's history to remove all traces of it.
- Automated Scraping: There are bots that automatically scan GitHub repositories for secrets and private keys. This means that exposure could occur within minutes (or even seconds) of the file being committed.
- Revocation & Rotation: If a key is accidentally committed, you'd need to revoke that key and rotate to a new one. This process can be complex and disruptive, depending on what systems or services the key was used for.
Sounds not good, so please don’t do it!
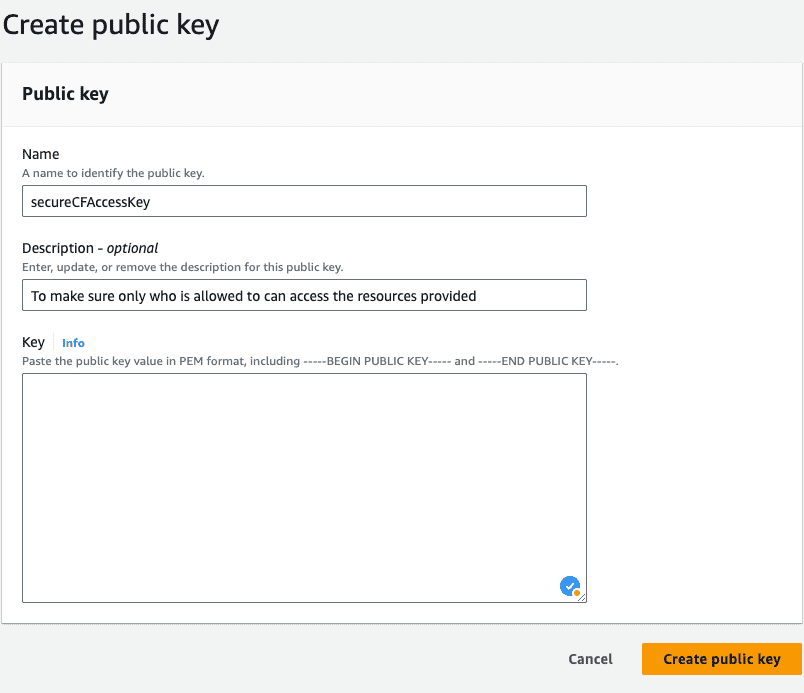
Safe the public key in CloudFront
Now open the public key file and paste the content into the dialog.
Create a CloudFront Distribution, If you not already have one. Restrict the public access to your S3 Bucket.
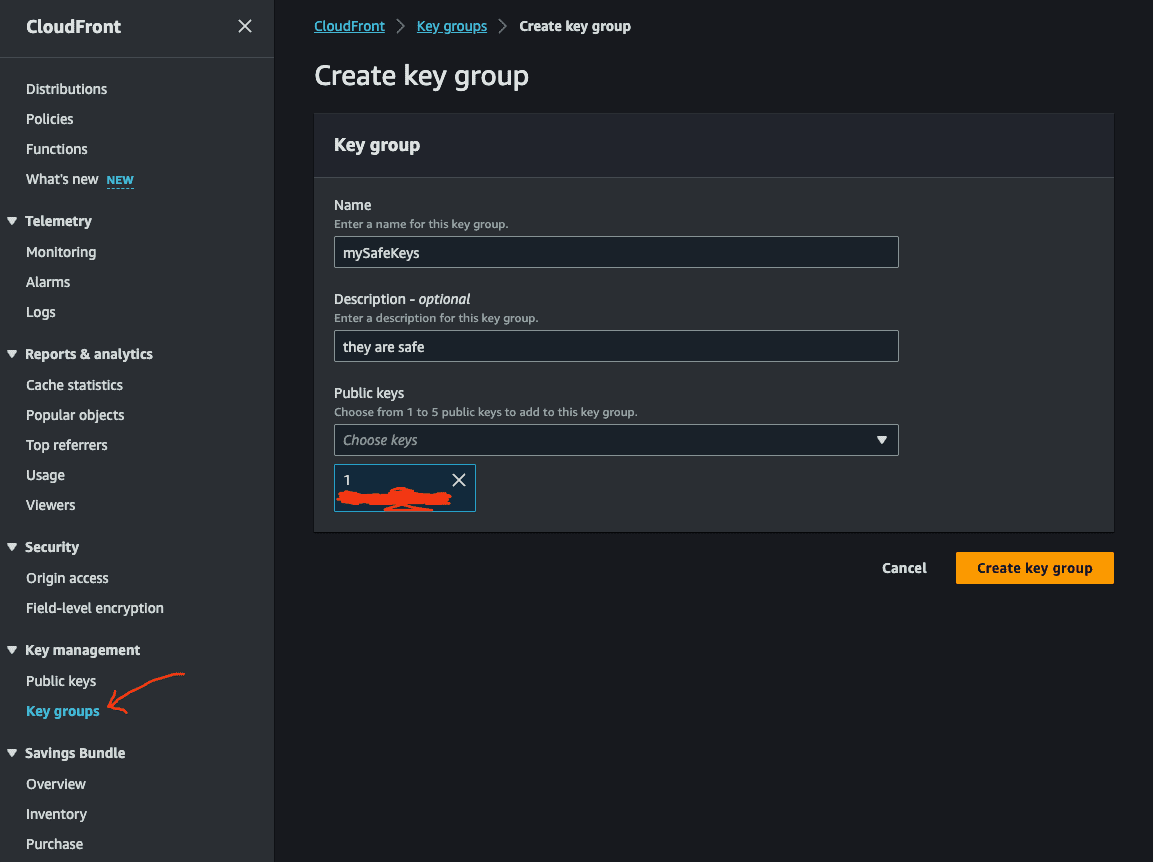
Create a Key Group
To create a Key Group navigate in the side menu under Key management to key groups.
Fill out the form and chose your public Keys that should be included.
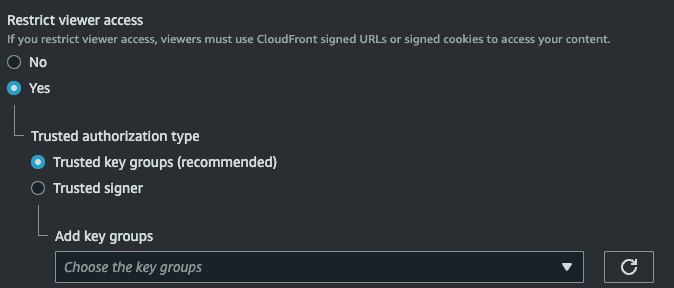
Restrict access to your CloudFront distribution
In your CloudFront settings, go to the behaviors tab. If you have already a behavior, edit it. Otherwise, here is a guide on how to set it up.
Scroll to restrict viewer access and check yes. Then select your key group where your public key is in.
Generate Signed URLs for AWS in your .net API
My first approach was to follow what chatGPT suggested and also most tutorials. Here is the code for it, but it was not working.
string signedUrl = AmazonCloudFrontUrlSigner.GetCannedSignedURL(
                resourceUrl,
                new StreamReader(@"private_key.pem"),
                keyPairId,
                DateTime.Now.AddDays(7)
            );
I had access denied error on any request. After digging a little, I found out that there is a better method to generate signed URLs that actually work.
How to fix CloudFront access denied error?
To fix the CloudFront access denied error, first double-check your CloudFront configuration. Make sure that you are using the right key group and try if you can access CloudFront when Create your signed URL like this:
string policyDoc = AmazonCloudFrontUrlSigner.BuildPolicyForSignedUrl(
            resourceUrl,
            DateTime.Today.AddDays(+1), // valid for a day
            null);

        string signurl = AmazonCloudFrontUrlSigner.SignUrl(
            resourceUrl,
            keyPairId,
            new StreamReader(@"private_key.pem"), // do not do it like this!
            policyDoc);

        Uri baseUri = new Uri(distributionUrl);
        Uri combinedUri = new Uri(baseUri, signurl);

        string finalUrl = combinedUri.ToString();
With the resource URL parameter of the policy, you can define the resources for what the signed URL is valid. When set to null, it is valid for every item on the bucket, or you can also do it folder wise. The signUrl method then will sign the given URL based on the previously created.
Please make sure to store your private key securely, storing it like this in the project root is just for the sake of demonstration.
This code actually works, and you have now a method to generate signed URLs. They can be shared with anyone and are valid for one day.
Have fun with them!
Conclusion
Securing S3 access is an important part of any cloud security strategy. By using CloudFront and signed URLs to secure S3 access, you can add a layer of security to your S3 objects and ensure that only authorized users have access to your data. Additionally, by using CloudFront to serve your S3 content, you can improve the performance of your applications and reduce the load on your S3 buckets.